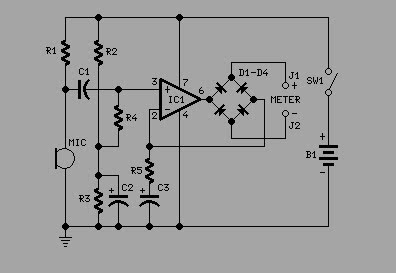
List coponent

R1................................... 10K  1/4W Resistor
R2,R3............................... 22K  1/4W Resistors
R4................................... 100K  1/4W Resistor
R5................................... 100R  1/4W Resistor
C1................................... 1�F  63V Polyester or Electrolytic Capacitor
C2................................... 100�F  25V Electrolytic Capacitor
C3................................... 220�F  25V Electrolytic Capacitor
D1-D4............................... BAT46  100V 150mA Schottky-barrier Diodes
IC1................................... CA3140  Op-Amp IC
MIC................................... Miniature electret microphone (See Notes)
J1,J2................................. 4mm  Output sockets
SW1.................................. SPST  Toggle or Slider Switch
B1................................... 9V
The precision of the measure is entirely depending on the frequency response of the microphone used but, fortunately, for the main purpose of this circuit an absolutely flat response is not required. Therefore, a cheap miniature electret microphone can be used.
Note:
Please be careful and set the volume control very low, to avoid loudspeakers' damage. Switch-on the Sound Pressure Level Meter and increase the volume of the amplifier in order to obtain an approximate center-scale reading. Repeat the same steps with all channels.
Terima kasih telah membaca artikel tentang Pengukur Suara Speaker di blog Kumpulan Skema Elektronika jika anda ingin menyebar luaskan artikel ini di mohon untuk mencantumkan link sebagai Sumbernya, dan bila artikel ini bermanfaat silakan bookmark halaman ini diwebbroswer anda, dengan cara menekan Ctrl + D pada tombol keyboard anda.
